Showing posts with label Product Design. Show all posts

Monday, 6 April 2015

6 April 2015

Assalamualaikum,
Hai. Apa khabar pembaca blogku ini? (aisehmen, betrip lagi bah si amal ni. hahaha)

     Lama dah aku tak kemaskinikan blog Roda Coklat ni. Sibuk dengan semester 4 ni adalah salah satu dari puncanya dan idea yang aku nak tulis pun kebanyakkannya pasal luahan hati yang entah, boleh dipublish ke tak. Sebab aku rasa macam nak mention real name ja supaya orang tu tahu yang aku tujukan post tu untuknya. Namun, alhamdulillah, aku masih waras dan behave, kalau tak memang tak tahu lah mana nak letak muka aku ni kalau aku betul betul buat post-post luahan hati sebelum ini. Hahaha

     Sekarang ni, hari ke-tiga dalam cuti pertengahan semester buat Universiti Malaysia Perlis (UniMAP) dan aku hanya duduk lepak dalam bilik yang ala-ala sauna. It's summer time.  Bahang bruh. hahaha.

"Duduk, lepak jer? takdak assignment ke amal oiii?"
- some of you might wonder that. 

or this

" Punya berlambak kerja nak due date lepas cuti ni, amal ni boleh pulak dia duduk lepak ja masa cuti ni?
- this thought might from my classmates because actually, we got a lot of things to do  which need to submit after this mid semester holiday ends.

Well, during these three days, I was more like trying to fix my life, you know. I looking for some motivation and doing some self -reflection which I think still have long way to go. Even though I aware that I should start doing preparation for all my subjects. Since, I think I messed up my Thermodynamics, Fluid Mechanics, and Engineering Mathematics III mid term test. This semester is pretty though! Dealing with subject that mostly 95% calculation really knock me down, because surely formula and calculation are just not my comfort zone to play with.

Not knowing anything really suck! My stupidity slowly kills me inside. And thats when I just keep silent in class, staring on the white board or lecturer's PowerPoint presentation. 
  • Some lecturer's style of teaching are just to fast for me, until I always left behind.
  • Some lecturer's style of teaching are like puzzle, they gave a starter, but they want us to finish until the end which way that I can't reach the end of the question.
  • and other problems which also come from me...
I don't think I have the capability to learn faster in subject that have calculation and formula. And I think its spread to other subject too. But what's now? I already choose this programme RK84- Product Design Engineering. Until one day, I post this on my Facebook.


The difficulty being a product design engineering student reminds me about the offer that I received when I applied to higher eduction after my SPM. I got TESL, Graphic design, and other course too. But yeahh all of them are located at Semenanjung which I know, I will not get the chance to take that offer. At that time, I was so obsessed with Politeknik Kota Kinabalu, one reason of my obsession is about the Taekwondo, since I still active joining the taekwondo competition. hehehe. Ok, that so old story. So, what's next mal?

Have you ever felt that, you want to be the most intelligent person that can study on your own so that you don't have to beg for someone to teach you which any means getting no help from other people? I felt this several time. I envy those who clever enough to study on their own.. How they do it  and become successful pass in their exam? How they study? Everything is 'how?'. 
  • I want to be successful like them.
  • I want my pointer above 3.
  • I want everything that I want.
hahaha. ok behave mal. One of my friends, told me, 'kena rajin', so I should be hardworking right? hm. My girl friends always say ' Kak Mal boleh! kak Mal boleh!' to me. Thanks to my close classmate and my housemate. Saying motivation words to someone who already knockdown like me, is like giving hope by watering the almost dead flower. May Allah bless us all. Aamiin.


Wednesday, 11 February 2015

My Part in Mini Group Project: The Excavator Base

Assalamualaikum and Hi.
This time I'm trying to post something different than I'm usually post on youtube.

It's about my part in our mini project for CAD subject in this semester. We were given a task to draw something related to agriculture tools or machine by using Catia V5. My group member got the drawing but with no dimension. So, we just randomly set the dimension except the certain parts that need to connect to the other parts. 

I'm just a beginner in catia and most of the method I used in this video are came from trial and error. So, if you have any better suggestion, you may leave a comment below. Thank you. ^_^

Thanks for watching.

Music used:
1. Haha, Taw (With Gary of LeeSsang and Kim Greem)


2. Beep by Park Ji Yoon


My Part in Mini Group Project: The Excavator Bucket

Assalamualaikum and Hi.

This time I'm trying to post something different than I'm usually post on youtube.

It's about my part in our mini project for CAD subject in this semester. We were given a task to draw something related to agriculture tools or machine by using Catia V5. My group member got the drawing but with no dimension. So, we just randomly set the dimension except the certain parts that need to connect to the other parts. 

I'm just a beginner in catia and most of the method I used in this video are came from trial and error. So, if you have any better suggestion, you may leave a comment below. Thank you. ^_^

Thanks for watching.

Music used:
1. Gatsu No Serenade by Suga Shikao
2. Tamagawa song in Honey And Clover.


Monday, 20 October 2014

My 19 October 2014

Assalamualaikum W.B.T / Annyeonghaseyo.

My second sister just called me at 9.35 am which wake me up from sleeping. She expect me going home this mid semester break, because my young brother and her are coming home for this mid semester break. I told her that I didn't going back to Sabah for this mid semester break. I didn't even open the air asia web page to look up for ticket. I decided to going back at the end of this semester, Insya-Allah.

So, I wake up, went to the living room with my laptop. Here I go again.
This time, was my exactly Catia Assignment. 4 Figures need to draw.

Question 1: Figure T6.5
As I saw straight line and rectangle shape, one word came out on my mind 'OFFSET'!
This will be a lot of offset line.
One of my lecturer commented as he saw my drawing progress,
"Banyaknya line Amal."
and I just smile without looking back. 
I'm just too immersed into this. 
HAhahaha
Step 1.
Let's start with the Sketcher.
I choose black color for the background with grid line. 

Step 2.
→Starting with select the zx plane one the specification tree then click 'Sketcher' icon.
[I'm not familiar with constructing line according to Vertical and Horizontal point s drawing, so actually I start with drawing a rectangle shape and offset those line until I got the intersection line. ]
→Remove all the aid lines so it will be looks like this.


Step 3.
→Got the zx plane view shape, click 'Exit Workbench' icon.
→Click the zx plane (the Sketch.1).
→Click 'Pad' icon until 'Pad Definition' pop up.
→Type: Dimension.
→Length : 42 mm
→Selection : Sketch.1
→Click 'Preview' then 'OK'.

Step 4.
→After pad operation, it will appear like this.
→Don't confuse with the 3 stripe white color, it because I forgot to turn of the lighting effect.
→So, I select the yz pad plane as shown in figure below then click 'Sketcher' icon.

Step 5.
→Entering sketcher, the plane will faced like this.
→By using aids from the offset lines, I drew the rectangle shape [red line].
→Click 'Exit workbench' icon.

Step 6.
→Click the 'Pocket' icon until the 'Pocket Definition' table pop up.
→Type: Dimension
→Depth: 10mm
→Selection: Sketch.2
→Click 'OK'.

Step 7.
→Repeat Step 4, 5, and 6 at the other side.
[Mr. Fendi had thought me how to do the mirror by using a plane, 
but suddenly, I forgot already the actual steps, so I just do it like this. If anyone have a better way to do this, I gladly appreciate it. =) ]
→Select the pad plane as shown below and click 'Sketcher' icon.

Step 8.
→Entering the sketcher, it may faced like this.
→The yellow lines are Offset line just find the middle.
→I drew the circle at the center with diameter of 10 mm.
[Oh ya! I'm not really sure about this, but as shown at the question. It stated that 'Through Hole 20 Diameter. Maybe it should be done by 'Hole' method, but yeah, I not quite sure how it works, so I just used 'Pocket' method.] So, this is how it looks after the pocket operation.

Step 9.
I just want to view this with another option,
so I select the 'Shading with edges and hidden edges' view. 
It's clearly show us the hidden drawing.


Step 10.(Extra but not so important) =D
→ Color: Red and white.
→Lighting: On
→ Just another classy finishing kunun. Ha3. Chill bro.

Xie Xie

Syukran

Arigato Gozaimasu

Kamsahamnida

Terima Kasih

Thank You

 for reading and judging? perhaps? hehehe

Alhamdulillah.

p/s: Have any suggestion? Just drop your comment below. I might consider it with calm and passion. Kunun. hehehe

Sunday, 19 October 2014

My 18 October 2014

Alhamdulillah, it's mid semester break.
Yet, it doesn't mean that me as a student may enjoy it like a honeymoon without assignments, tutorials, lab reports, and not to forget the list of mid semester test are waiting a head as soon as the mid semester break is over.

So, I began with my CAD's assignment.

My lecturers gave us 10 pieces of diagrams, 6 of it were our tutorial which should be done during class and another 4 pieces are our assignment.

Alhamdulillah, I had finished drawing 5 of 6 during the class session.
So, this would be the 6th diagram drawing session 
which I proceed at Kolej Kediaman Wang Ulu, Kangar, Perlis.

6th Drawing : Figure T5.12


Step 1.
Open Catia V5R16 

I used Part Design under Mechanical.

Step 2.
→Select the zx plane on the specification tree on the left side.
→Click the sketcher icon.
→ Draw the box with it's  width and height.
→ Oh! I used offset line to the the middle.


→Then, yes offset line again and again to get the intersection point. I just know the advantages of offset this semester. I never familiar with offset when I was learning Autodesk Inventor in my diploma at semester 5 (if I not mistaken) or AutoCAD during at degree semester 1.


→ Got the intersection point, I drew a new line based on it. Then remove all the offset line. So, This is how it's look like.


Step 3.
→After I got the shape on zx plane. 
→Click the icon 'Exit Workbench'.
→Click the 'Pad' icon.
→Select the sketch on zx plane until the 'Pad Definition' pop up.
→The diagram shown thickness in 40 mm, I wrote 40mm in the 'Length:' blank box.
→Likely, I prefer the pad went backward, so I clicked the 'Reverse Direction'.
→Then, click on 'Preview' to see how is it looks like.


Step 4.
→Select the xy plane on the specification tree.
→Draw the box, I used the offset method.


Step 5.
→Click 'Exit workbench'.
→Click 'Pocket' icon (the orange icon as shown below) until the 'Pocket Definition' table pop up.
→Type: Dimension.
→Depth : 18 mm
→Selection: Sketch 4 ( the box)
→Then, click 'Preview' to view the effect of pocket operation.


Step 6.
→This is how it supposed to be done.
→Then, select the pad as shown in the figure below.

Step 7.
→ Select the pad and click 'Sketch' icon.

Step 8.
→On the pad plane, draw a box shape.
→Click 'Exit Workbench' icon.
→ Click 'Pocket' icon, until the 'Pocket Definition' table pop up.
→Type: Dimension.
→Depth : 100 mm
→ Selection : Sketch.5 (the box shape)
→ Click 'Preview' to preview the effect after pocket operation.
→ Then, click 'OK'.

Step 9.
→ Then, tadaaaaa~
→It should be looks like this.

Step 10. (Extra option)
♥As my lecturer shown this function of coloring.
♥So, why not I applied it together in this drawing.
♥It because my lecturer encouraged us to play and used all the function in the CATIA software.
♥So, this feels like playing game.
♥I don't think I was studying or working at all.
♥Maybe, because I know how to do it? and it's quite fun?
♥I don't know or realize how long I spend my time to do only this figure T5.12.
♥Because sometimes, I found its quite confusing and hard to find a way to do the certain part,
but still, keep trying.
♥So, the final appearance of the Figure T5.12 is like this.
(^______^)v


Anyway, there are a lot ways can be used to draw this figure. 
This is the only way that I know how to do it.
It anyone have suggestion to do this better or improve my step in advance.
[Anything comment about grammar also can do. hehehe]
Just drop your comment okay.
I gladly appreciate it. ^____^
Thanks for reading.

P/s: I'm still a beginner and new to CATIA. So, don't ask me about the comparison of CATIA and other product or asking the advanced function of CATIA. Honestly, I don't know. I just spilled out here what I understand during my CATIA class lesson. Oh ya, I'm still weak at tangent though. =D

Sunday, 21 September 2014

My 21 September 2014

Apa cerita kamurang hari ni?

Cerita aku...

Kawan kelas ajak buat tugasan CATIA, dan sorang lagi nak datang hantar buku yang aku pesan sambil buka juga tugasan CATIA, Nisa namanya, org Perak. Ada juga la, belajar CATIA, dia dah siap buat, aku pula belum mula satu apa pun.

Jadi kena siapkan tugasan yang pensyarah subjek CAD bagi pada hari Jumaat lepas (19 September 2014). Lukisan ada 4. Kami dah buat dua lukisan tu pada hari pertama kelas dalam masa 4 jam, sebab baru nak belajar guna CATIA kan.

Kertas Tugasan


Figure T2.4 (b)

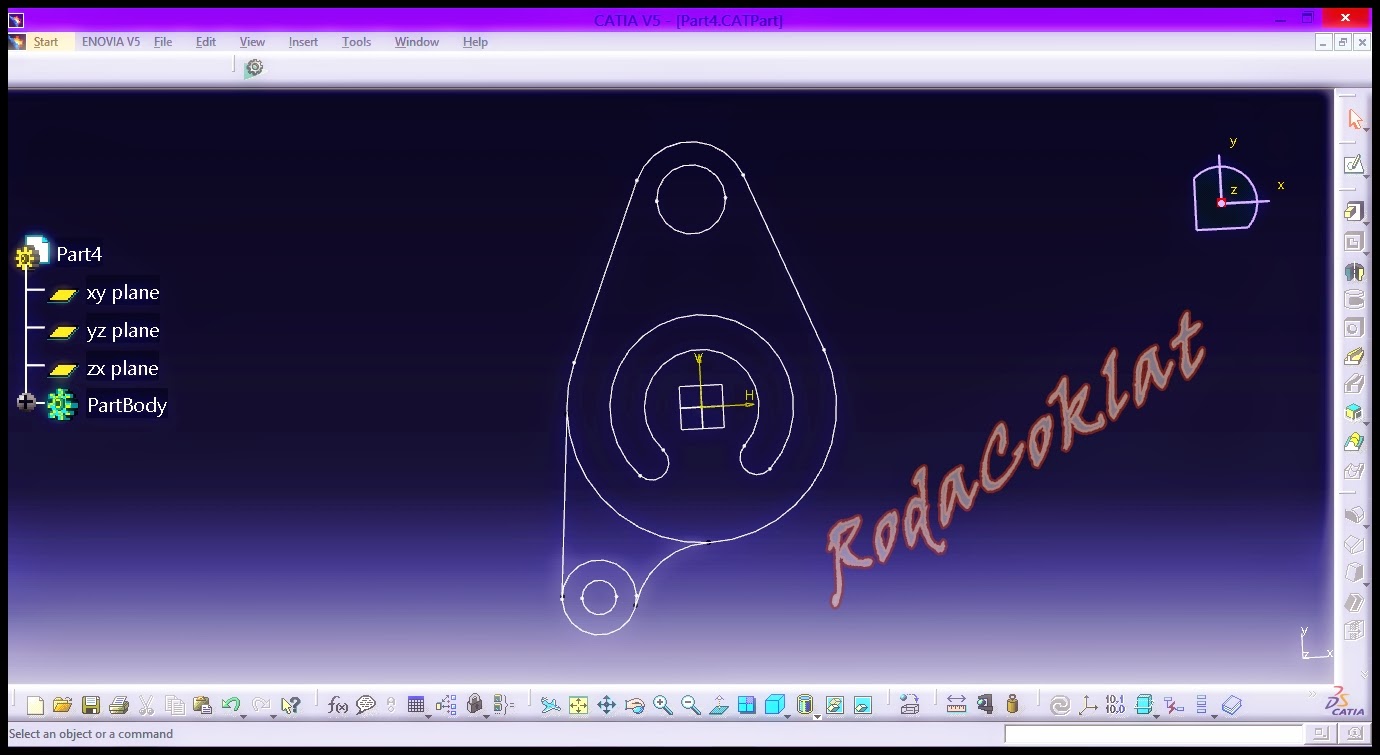
Masa ini, aku ada masalah dengan bulatan kecil di bawah tu bila aku nak buat tangent dengan garisan lurus di atas tu. Secara automatik radius bulatan tu mengecil pula. Ini antara perkara baru yang aku jumpa masa buat tugasan CATIA ni. Geram juga kadang-kadang.

Dah siap! (Pada pandangan aku lah). Ada satu perkara yang aku hairan amat, sehinggakan aku bawa laptop aku berjalan pi jumpa dengan pensyarah di depan waktu kelas dah habis. "Kenapa ada dua warna, hijau dan putih?" Pensyarah kata itu biasa ja. Asalkan jangan warna ungu, sebab kalau warna ungu itu maknanya dah Over Constraint.

Pandangan setelah keluar dari Sketcher.
Oh ya! Ini aku guna paksi XY plane masa buat dalam Sketcher


Figure T2.4 (a)

Rakan kelas aku, Farahim, telefon tanya pasal nak buat 6 bulatan kecil tu, masa aku tengah buat lukisan di atas tu. Malangnya aku terlupa langkah-langkah nak buat rotation tu. Masa nak buat ini pun, aku pun hampir mati kutu nak ingat langkah-langkahnya. Alhamdulillah, ingatan aku masih di tahap yang ok lagi. Teringat cara-cara buat masa dalam kelas Jumaat lepas. Agaknya, kalau aku tak follow up dalam kelas, sah aku tak tahu nak buat rotation ni.

Bulatan yang beradius R105 tu, aku guna 3 point circle. 
Wujud juga perasaan 'Eh, betulkah juga ni?' masa aku buat tu, tapi entah lah, banyak style Try and Error ja yang aku buat dalam CATIA ni. Kena tanya pensyarah juga ni.

Alhamdulillah, dah siap. 
Mula tadi dalam jam 8.30 mlm, 
habis buat dua lukisan ni lebih kurang jam 11.58 mlm juga lah. Lama juga~! Takpa mal. 
Keep calm and upgrade, Insya-Allah.

Tiba-tiba rasa nak jadi pensyarah CAD pulak. hehehe


Al-Fatihah.

Selamat Malam, baca doa tidur ya.

Assalamualaikum, Konbanwa.


Saturday, 20 September 2014

Pengiktirafan RK84 di UniMAP?

Hari Sabtu. Secara rasminya, bermula sudah hari ko-kurikulum di Universiti Malaysia Perlis. Aku ambil peluang untuk melayari internet melalui laptop. Blog tak dapat buka melalui HP Lenovo aku ni. entah, aku yang tak reti nak guna kot. Ok, put that aside for now. Hahaha

Online dan online, tiba-tiba aku teringat pemohonan JPA dah dibuka pada 17 september 2014 hari tu dan akan ditutup pada 23 september 2014 ni. CGPA aku ni tak lah okay sangat dan tak memenuhi syarat pun, tapi aku nak cuba isi jua. At least, I can wish for it, can I? :D

Filling up the online form one by one. then, it's time to fill up my academic information. 

Awal tu aku dah kalut dah, tak jumpa nama program ijazah aku dalam suggestion list. Kalau tiada dalam suggestion list bermakna Ijazah yang aku ambil sekarang ni tak diiktiraf oleh badan-badan atau agensi yang memberi pengiktirafan. 

Akhirnya, selak tabs sana sini baru jumpa.

Aku jumpa di mana?

Di sini,

http://esilav2.jpa.gov.my/online_progs/esisraf/


Dan dengan itu, dah diiktiraf lah RK84 di UniMAP ni. Aku ada juga nampak notice pasal pengiktirafan ni di papan kenyataan di pusat pengajian kejuruteraan pembuatan, cuma kadang aku sendiri lupa. Alhamdulillah.

Friday, 11 July 2014

My Sketch Paper 007

In the name of Allah, most Gracious, most Merciful

Chair

Recently, my back was in pain because I sat and tend to bend my body while facing my laptop. So, I started drawing some chair. A few moment later, I notice that, in Emergency Couple drama, there was a scene when Oh Jin Hee meeting her father-in-law at a cafe ( I guess ). They were sitting on the chair, I don't know what the call it but for now I call it Korean Chair. That because they were sitting cross-legged on top of cushion chair which the chair has no stand at all. 

(I'm not quite sure, if you understand my English, sorry about that).

Chairs
Some of the design, I making a scene when I want to lay on a sofa with watching my favorite tv show. I guess, I just design them without thinking how they will going to be fabricated. Simple careless design, but I will put that aside later, for now, just focusing on how I draw the object. 

If I tried design them once with all the manufacturing process, 
I might not done a sketch at all. So, be chill Ms. Haha.


My Sketch Paper 006

In the name of Allah, most Gracious, most Merciful

Complex Round

Based on youtube video 'Sketching tutorial How to draw complex round' by idcreatures, 
I refer to the video tutorial to draw this. 
At first, it quite confusing, so I keep shading the wrong part.
Then my second trial was a bit accurate but still I almost shade the wrong part and it took a lot of time to follow the tutor steps.


Complex Round

The second drawing is about cylinder shape. 
The first one looks fine but I drew the second cylinder without looking the video as I try to make sure I grabbed her tactics well. 
*please ignore the cylinder shading. hehehe

The third drawing is about cone. Again, the first trial is failed. 
I repeated the video several time, to get this one right same like the first drawing for the shading.

In the video, she (the tutor) used sharpie to bold the sketching line.
I found it awesome. I think I would get some of them, soon. hehehe


My Sketch Paper 005

In the name of Allah, most Gracious, most Merciful

Simple Round

I drew this based on a youtube video tutorial. 'Sketching tutorial How to draw simple rounds' by idcreatures. In AutoCad software, this might called as fillet. I had tried this while using Autodesk Inventer, the effect was awesome. Doing fillet after extruded the object, that was new for me while studying at poly. That was done using computer, so how about freehand. Yeah, need more practice ok, Ms. Haha.

Simple round / Fillet
That messy one, I was trying to do some shading or shadow. Seems, it wasn't a success. Other than that, I'm doing some hatching which I assume it as it having a cross section or the flat surface of the object. 

Hm, maybe I should starting doing some shading? ah, maybe later lah kali.

My Sketch Paper 004

In the name of Allah, most Gracious, most Merciful

Square in Perspective

I was trying to make a good pose for every square and rectangle, but this only I can do. From what I learn from the past there are 2 type of view; bird view and worm view. 


  • Bird View is a view from the top of the object.
  • Worm view is a view from below of the object.


It would be drew in more organised view, but for now, I just make this in simple form. Perspective drawing is a topic that I learn in engineering drawing, not quite sure whether in form 4 or form 5. But it doesn't matter because all of it are tested for the SPM examination.

While in product design, we were given three objects that located at the center of the class which need to be drew from our perspective. So, that would be advance step of drawing based on perspective. For the first start in learning perspective, it is better drawing using by a set of ruler. 

Start from basic. For more info, do some research about it, by simply type 'drawing perspective for beginners' on youtube. That would be a good start. I'm still learning about it because I find it difficult to draw object in perspective by freehand instead of using sets of ruler.

I got so much need to be learn. . .


Thursday, 10 July 2014

My Sketch Paper 003

In the name of Allah, most Gracious, most Merciful

Pattern

     I was trying to applied the straight line and the circle into other concept of drawing. Then, I found about pattern. In order to achieve my objective to apply it into pattern, I research more info about pattern through youtube and google image. There are many awesome video showing tutorial about pattern, then I swayed into some doodle videos. Very talented people! Ok.

     Ah! The numbers were edited by using photoscape, I don't even that creative to draw that. Ok, Some of those pattern got wrong start (far away from the tutorial in the videos) but luckily I saved them. Hahaha. No lah, as one of the tutor said, the is no mistake in pattern, you can always adjust and draw variety of pattern. So, with that tips I barely saved those pattern before I stop drawing and throw them into dustbin. Joke. Ok, it's not funny enough.

Want to guess which of them that I talked about?

I will tell you at the end of this post. :D


20 Type of pattern


     I drew this on Saturday night 5 July untill Sunday early in the morning 6 July 2014. It was because my sleep routine had changed after my final exam ended. While staying at Wang Ulu residential college before I came back to Sabah, I used to stay up all night watching korean drama and running man, then I sleep at 8 am or 9 am untill 1 pm or 3 pm. Then automatically, I sleep during the day and stay awake at night untill 7am or 8 am. I tried to change it by not to sleep until afternoon, then my head feel heavy and I felt like empty, my sight become fuzzy. Then, I tried to sleep at 2 am or 3 am, I was laying with closed eyes, but I can't sleep. So, i decided to do this.(How's my story? hahahaha)


Still guessing? 

Or you alreadly saw the answer? 

Ok lah,

the answer are. . .

Number 5, 15, and 16.

My Sketch Paper 002

In the name of Allah, most Gracious, most Merciful

Circle

I drew these circle because I am very weak in drawing object in circle shape or with a round surface. I already pictured the circle that I'm going to draw in my mind, with beautiful circle and tidy in a box, but yeah, this is the reality. 

Some of the circle was made with a rushing mind and I notice that the habit of me, trying to keep calm and make a beautiful circle again.

Maybe you who seeing this picture can predict which part of circle that I done in rushing mind.

Equipment used:

  • Pen (Ball pen 0.7)
  • A4 Paper


Circle


Well, I don't remember which one actually. 
You did the guessing? 
ah, sorry.. 
but thanks because your effort.
Have a nice day, :D

My Sketch Paper 001


In the name of Allah, most Gracious, most Merciful


Straight Line

Our first lesson in Product Design course thought by Mr. Badrul was drawing straight line. 

What? Seriously sir? Straight line only? Ah~ piece of cake (easy), I thought that was an easy task. 

At first he allowed us to do several square or rectangle using rules. Then starting to draw the straight line. After we done the first page, he asked us to do the same straight line but this time without the square or rectangular guide. We need to draw the straight line at the same time make sure it form a square or rectangular shape. He added rules, No eraser, Draw the straight line in One-go. 

Then, my first try was not that great enough. T_T

Equipment needed:
  • Pen or pencil
    • It is up to you, to use any kind of pen or pencil. I'm not including any tips about the line thickness in this post because I also not quite sure the exactly type of them. Just a bit of knowledge, enough for my own drawing.
  • A4 Paper
    • Normally, a white blank paper. Using such examination pad won't do because I might get distracted with the line on the paper.
  • Ruler
    • I might used a ruler to draw the square or rectangle as a guide for drawing the straight line in a tidy box shape.
  • Eraser
    • As this for my own practice, I may used eraser to erase some part that I spoiled, but since I used pen, that wouldn't do, right? hehe


Pattern of straight line
The picture above was drew by me on 4 July 2014. As you can see, some of them are not straight enough to be call straight line. But as I doing this, several thought appear at the moment:
  • Imagine I was drawing a product thickness or shape.
  • It is all right if I fail to draw straight line for the first time, later on, I can compare how much I had improved.
  • Never be afraid to use any tactics to produce a straight line such as:
    • Set the right angle for my hands while drawing.
    • Rotate the paper while drawing some angle of straight line.
    • and other. . . 
  • I must focus while drawing the straight line.
    • There was a moment, I lost my focus while drawing these straight line, then I notice it affect the line straightness.

Our lecturer keep saying that everyone can draw. They only need to practice. They need to get to used with imagine the object, send the signal from the brain to the hand, then the hand would produce it based on the signal given by the brain. 

So, keep learning and practice Ms. Haha... Hwaiting.

My Sketch Paper (Intro)

In the name of Allah, most Gracious, most Merciful.

I guess this would be the introduction for my own mini project. 
Yes, my own mini project fro myself. (Just full of myself only)*sigh~

Introduction

     Drawing. My father and my mother were used to draw and paint something related to scenery, animal, and flowers when I was young. I thought I was also has the same skill as them, so I tried some painting but unexpectedly I was not that great. So, I think I can't draw anything. 

     However, as I was in form 3 at SMK(A) Tun Said, I got interested in Engineering Drawing. That when I was affected by my two senior roommates as they always stayed up in front of the door for the corridor light near to my bed. So, I look at them doing their technical drawing so diligently until I fell asleep. As I got into the technical science class, Lukisan Kejuruteraan (LK) = Engineering Drawing has become my most favorite subject. Even though, my first result for LK was 22, for the first time I don't want to give up in learning and I felt being challenged to score the subject because of my LK's teacher, Cikgu Sahrul, said that he encouraged female student to drop the LK and took Teknologi Kejuruteraan (TK) instead because of the school changed the limit subject to be taken for SPM to 12 subject only. So, from 13 subject, we need to drop 1 subject, as for the technical science student. I understand why cikgu Sahrul did that because most of female student couldn't catch up with the learning progress and that might affect their SPM result. It's far more different with the male student, they were just fine with it. At that time, I set my mindset to be a Lukisan Kejuruteraan's teacher. With that mindset, my leisure time was filled by practicing drawing technical drawing at the hostel. Even with the repetition of practice, I still got problem with tangent, I guess that my weak point in engineering drawing. At the end, I got A1 for my LK subject. Yes, only that one A of my two A. But, I feel good enough with the result. 

     In order to pursue my dream to be an engineering drawing teacher, I filled my first choice in politeknik application with Diploma Kejuruteraan Awam, and second was Diploma Teknologi Pembuatan (I refer my LK's teacher academic background). I don't have anyone that I can ask about making my choice, well actually if I was being wise, I should ask my teacher himself about the diploma that I was going to chose. My teachers who took Diploma Teknologi Pembuatan were cikgu Sahrul and cikgu Norwati. However, I was afraid and I was not that friendly to any teacher. I just go with the choice with doing any research ( I was only 16 years old at 2009! ah, excuses! hehehe). The result came out, I got Diploma Teknologi Pembuatan ( Mechanical). There was only a few subject that related to drawing as I remember during my 3 years as DTP student. Those subject was Autocad 2004 and Tool Design. Apart from those, I felt loss my way to be a LK's teacher. A day in my semester 5 at Politeknik Kota Kinabalu, I was so frust and as I remember that was my very bad day. I started to think if DTP was a good choice for me. All the subject at that semester was killer subjects. Theory and Calculation that I can't catch up during classes. 


     I was walking alone at the walkway near to the Dewan Serbaguna during the evening. I really need someone to talk at that time. I search my friends number through my phone, and I end up calling my RP's discipline chief. He not even my close friends and was a serious and sarcastic person, well, almost of the time. Then we always fighting with each other but sometimes we were just fine working together, and he and I were in Taekwondo club together. He already graduated from poly and was working at that time. I don't know why I called and trusted him to tell my misery thought, maybe because I already been working with him in the RP club made me easier to approach him. Unexpectedly, he doesn't seems like the person that I been working during those past semester, he gave me a good advice and since that I building up myself again to brave enough to face the semester challenge. That was a story when I was swayed out due to the hard challenge being a DTP student at politeknik kk.  Alhamdulillah, I passed my diploma.

     As I told before, there were only a few subject that can relate me to drawing or design. I work as a supermarket cashier for a year and a half before my application for upu degree was announced. Being a Diploma Teknologi Pembuatan's student, I am being too far way for any drawing or sketching matter. I had been through the unknown diploma world, as for degree, I being a little bit more specific. Doing some research about the degree that I'm going to chose. I choose product design degree  because after all, it's in manufacturing course also. My father insisted me to choose educational degree or stay with the manufacturing degree course. At that time, upu doesn't offer many educational degree program related to manufacturing, so I don't have many choice. At the end, I got offer at UniMAP, with the product design degree. I felt like I was coming back on the right line track.

     How it's been a product design engineering student? Well, I just passed my first year as a student after leaving the student world for a year and a half. A half of the year, I faced my weakness in calculation again. I took the Engineering Drawing subject, as I want to relearn all the things that I have been forgotten. I admit that, I lost memory all about study, so I felt like I never learn some of them, while some of them I did learned but I only had very poor memory, and some of them were just VERY NEW to me. Going through the first semester, I met this subject, Product Design. Now we talking about my main reason of my mini project " My Sketch Paper". This subject, requires student to sketch design by freehand. Again, facing my old chillhood weakness. I can draw technical drawing more confident with rules and T-square, but NOT freehand. The Product Design subject's lecture are Mr. Badrul and Mr. Bakri.

     We were given sketchbook, sketchpad, and other stationary that function to help in sketching, drawing, and painting. The sketchbook and sketchpad would be submitted at the end of the semester for our assessment mark. Luckily, there is no final exam for this subject. All we need is sketching and sketching. Oh ya, not to forget, a mini project with the clock theme. That part, hmmm, aaaa, if I have time, I will write a post about it, or maybe not. Depends lah. 

So ok lah. Ok lah, looks like some part of this introduction is out of the plan 
but I'll let it be as it is. So let's begin. . . . 

********** * * * * * * * -------- * * * * * * * **********

Foolish grammatical errors? Feel free to comment. (^^,)